Making Time Lapse Video with IP Cameras
2012/07/13 5 Comments
What happens when you find yourself with two IP cameras which you don’t really use? You just make some funny stuff with them!
This post shows how to use an Axis IP camera and a netbook to record a timelapse video of a car travel… including a 15 minute timelapse of car trip from Italy to Germany!


Big “Red” Disclaimer
While doing techy stuff involving cars is fun, having a car accident in the process is not.
So, if you are planning to record a timelapse while driving because you got the idea from me, just try to resist the temptation of tuning the scripts while in the the fast lane.
Of course don’t try to blame it on me if you have a crash while re-crimping a broken Ethernet cable in the middle of the road, or if the German Polizei suddenly becomes interested in the funny white thinghie attached to your windscreen…
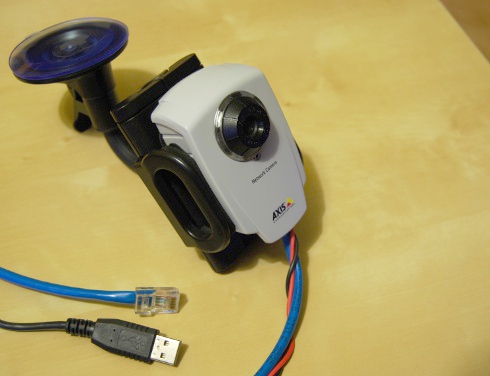
The Camera
The camera is an Axis 207W, modified to remove the bulky external antenna.
The camera is used with wired Ethernet connection for reliability, so the host PC was configured with a dhcp server on the wired port by default.
Also, this camera uses a 5V supply, which is really convenient as you can run it directly from an USB port.
A more complex setup with two cameras would require a small network switch. If you are interested in that, I have a DIY ethernet switch design which can also be modified to be powered from a USB port… check it out!

Hardware
A nice thing about this camera is that it’s just as big as a mobile cellphone, so that you can use any cheap universal phone windscreen mount with it. Of course, it has to be adjustable enough to let you point the camera to the outside, unless you want to record yourself driving.
I actually used a Cellular Line mount, bought for less than 15 Euros.

Power Supply
As the camera is powered from a netbook’s USB port, you just need a car charger for the netbook itself, so that you can leave it powered on during all the travel, as it’s going to keep eveything running nicely for a couple of hours while the car is stopped.

Luckily for me, my old EEEPC 701 charges with just a 9.5V/2.5A power supply, so I only had to wire it to a small adjustable DC/DC step-down converter I had lying around. The actual part number is TPN78020, and fits nicely in a car cigarette lighter adapter.

Also, I used another USB port to charge my GPS navigator… you may also want to use this for saving GPS coordinates together with the video frames.
Grabbing Frames
Axis cameras have a really straightforward network interface to grab single frames, as you just need to download a frame file via HTTP using whatever scriptable tool you like.
This is a simple script to grab a frame each second (approximately), using the unix timestamp as filename:
#!/bin/sh

# NOTE: replace user, password and camera-address with the actual values
SNAP="wget -nv http://user:password@camera-address/axis-cgi/jpg/image.cgi"
OUT=/mnt/sd/frames

while true; do
        $SNAP -O $OUT/$( date +%s ).jpg
        sleep 1
done
You may want to change target directory each hour or so, just to avoid having too many files in the same directory. A simple modification of the output file name expression would easily do the job.
To see the camera in realtime, you have to use an RTSP capable player, like gstreamer of mplayer with live555 plugins.
This is the actual gstreamer pipeline I use for axis cameras:
#!/bin/sh

gst-launch \
        rtspsrc location=rtsp://user:password@$1/mpeg4/media.amp latency=0 ! \
        decodebin ! \
        xvimagesink .
This is mostly useful to find the best place to fix the camera in the car.
Keep in mind that many IP cameras and webcam does a really bad job with high-contrast images, so avoid pointing the camera where it takes part of the car dashboard into the frame.
Rendering the video
I render my videos using the mencoder mf plugin. It takes a path with a wildcard as an input and write out an encoded mpeg4 file as a result.
I had my frames in multiple directories, so this is the actual commandline I used:
#!/bin/sh

mencoder "mf://?/*.jpg" \
        -mf fps=25 \
        -ffourcc XVID \
        -o /tmp/output.avi \
        -vf pp=de \
        -ovc lavc -lavcopts vcodec=mpeg4:vbitrate=1800:mbd=1
That’s it! The file is ready to be uploaded or post-processed with some video editing application.
Final Result
This an actual run of a ~7 hours car travel from Padova (Italy) to Erlangen (Germany), with frames captured every second and rendered at 25fps.
For the Braves
If you think the netbook-camera setup is just too easy, there are many ways to make the whole thing more interesting, including:
- using a second camera to record both the road and the passengers;
- recording gps positions together with the picture and render the actual point for each frame on a map (really google-ish);
- recording the whole CANBUS data stream for the car ECU to keep track of car speed/revs during the travel (seriously, don’t do that).
This is Way Too Complicated!
So, you like the idea of recording a timelapse but you don’t really want to wire Ethernet cameras and custom power supplies around your car? Fair enough! Just grab your iPhone and download Stop Motion Cafe from the iTunes store.

This is a free application from my good friend David, which allows you to use your iPhone to grab images at programmable rate… and even render the final timelapse video on the phone itself… give it a try!


Grande Baltino!! figo!! :D
Grazie caro! :P
Hi, great project! Can you help me with how to wire the power to the cam to use usb? I have an axis 207 with a regular power adapter. Thanks
Hi Warren, the camera is powered at 5V, so just rip an USB cable apart and rewire the black and red cables to the positive and ground of the camera, using either the barrel jack or the screw terminal on the top (look at the manual for the pinout)… Should be fairly easy!
Cheers,
Fabio
Worked perfect! Thanks